Showing posts with label eggs. Show all posts

Tuesday, December 1, 2009

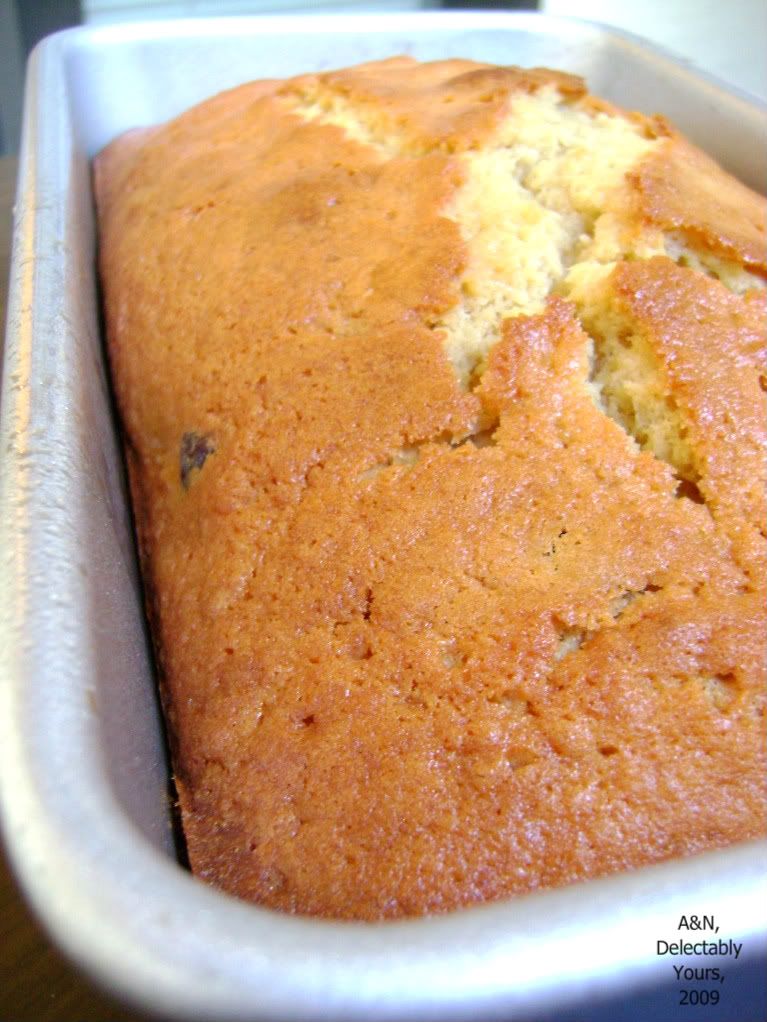
Orange Cranberry Loaf

As a kid, I never really had the opportunity to eat oranges because my father hated them. My initial hate affair with oranges began when I was subjected to bioterrorism by my cousin. She used to take the orange segments and squeeze it in front of my eyes, such that it unleashed a spray that wreaked havoc in my eyes. But like so many things that we used to hate as children and ended up loving them once we grew up, I eventually came to love oranges.

As far as baking with oranges goes, the flavor really lies in the peel/zest rather than the juice. That's because of certain oils and alcohols with intense aroma and certain glucosides that contribute to its bitterness. The idea behind this loaf/cake is to get a very intense orange flavor and complement it with something that goes well with it.

Photobucket

Cranberries and oranges are a popular combination. They're often used in breads, muffins, scones...even cookies! But I chose them because they are commonly used during thanksgiving and I was planning to take this to a friend's place during the Thanksgiving weekend.
Photobucket

Here's the recipe:

2 cups all-purpose flour
1 stick (8 tbsp/4 oz) butter, at room temperature
1 tsp baking powder
1/4 tsp baking soda
2 eggs
juice and peel from two oranges
2/3 cup sugar*
1 tsp vanilla extract
1/4 tsp salt
1 cup water
1/2 cup dried cranberries (Craisins)

* the amount of sugar really depends on how sweet the juice from the orange is. Please adjust accordingly.

1) Keep the juice from the oranges separately. With a knife, remove the pith from the peel as much as you can. Using a peeler to peel the oranges works great for us.

2) Simmer the peels into a saucepan with 1 c water and the sugar. Make sure that the peels are fully submerged in water. Simmer until the liquid reduces and the peels become really soft, about 10 mins or so. Remove from the stove.

3) Strain the liquid 'syrup' and let it cool. Once the peels have cooled down, chop them into tiny bits. Add the orange juice to the syrup once it has cooled down. The total liquid should come to 1-1 1/4 cups. Which is why I recommend adding the orange juice into the mixture after the syrup is done. You could always drink the excess juice. The syrup....not so good for you ;)
4) Preheat the oven to 350 F.

5) Sift the dry ingredients (flour, baking powder, baking soda, salt) into a bowl. Add the cranberries and toss them just a little.

6) In a larger bowl, cream the butter with an electric beater for 3-4 mins. Add 1 egg at a time and beat for a good 2-3 mins. The mixture may look and be curdled. That is fine!

7) Add the dry and wet components alternately, beginning and ending with dry ingredients. after each addition, fold gently with a spatula until you stop seeing 'dry' lumps of flour.

8) Pour the batter immediately into a 9X5 greased loaf pan

9) Bake in the middle rack for ~35 mins. or until a skewer inserted comes out clean. Do not open the oven door until you see the top start to crack. In case your oven doesn't have a light, you can forget about it for at least 25 mins.

Photobucket

We personally loved this cake. It certainly had the intense orange flavor that N was looking for
and small bites of orange peel that I was looking for. The cranberries proved to be a good addition too. They were well distributed throughout the loaf so apparently the 'coating with the flour' trick worked in this case. You could further 'enrich' the cake with some orange-sugar icing or even serve it with some whipped cream or orange scented whipped cream.
Thanksgiving...its supposed to be about sharing; another thing I used to hate as a kind but have grown fond of now ;)
P.S. - Something's wrong with Blogger and its taken us hours to post this recipe and format it! Any clue what?

Thursday, August 20, 2009

Poor Man's Brioche - BBA!

Forging (not!) ahead on the BBA, we present to you a cousin of the beautiful Brioche. Imagine our surprise at the class system in bread making. This brioche we made is called the Poor Man's Brioche and lacks the bright, rich yellow color of a Rich Man's brioche. Guess why. There is less butter and less eggs.
A and I decided to be poor in terms of butter than be too rich for our waists and tried the Poor Man's Brioche from Peter Reinhart's Bread Baking Apprentice. We're lagging behind big time on this challenge and don't mind it as much. With my tooth ache, apartment hunting, trip planning (more details later!) and other issues, we've hardly found time to cook or bake anything luxurious. Dinners end with salads or couscous or bulgur. Of course, thanks to my tooth ache, salads are out and am feasting on rice since that is the only thing I can eat without using my teeth to bite. You know?

Anyway, this brioche was outstanding! For being a poor man's brioche, it was quite rich and we could taste the butter in this bread. We'd love to try out the Rich Man's Brioche sometime in the future, but I guess that's not anytime now! We ate up this bread just like this - did not make French Toast as planned or even a sandwich. It just disappeared in the night and I had it with some soup the next day for lunch.

Photobucket


The one thing about Peter Reinhart's recipes are that it works to a T. It works just like he says it does. We have several cookbooks including some from popular authors and there are anomalies here and there. Sometimes, we find stuff too buttery, too bland or too spicy. But with Peter Reinhart, I could do this blindly and reach where he wants us to. His instructions are simple, brilliant, the ingredients very simple and easily substituted with common everyday stuff in some cases. So, if you're looking to buy a good bread book, go no farther. Pick this one up!

Photobucket

Coming back to the brioche, the crust was brilliantly golden and it glistened. We didn't bake it in Brioche pans since we didn't have any, so ended up baking it in a regular loaf pan. Next time, it will be in that cute little Brioche tin! While the photos themselves may not show the luxuriousness of this bread, the shining crust and the brownness is for real. A was in raptures seeing this bread and claims that so far, this is his fave bread in the book. Me? We'll see. We have a lot more bread to go through and I love herbed, spiced breads more than anything else. So, wait and watch! :)

Photobucket

Go check what the other challengers are doing with their bread in the Flickr slide at Nicole's. Some of them've gone far ahead, and lent us valuable lessons from the mistakes and the learning they've garnered from this book. Thanks to all of them for that. Check Nicole's blog to see if you can join! :)

Thursday, May 14, 2009

Ricotta Gnocchi - Daring Cooks!

We are back! Can you tell? Can you tell that I'm posting this in a hurry? This time, the cooks got an opportunity to get daring, and you know how Daring A and I are :P, so we signed up and didn't really regret it. Oh, my waist did, but then what is that treadmill for, and husbands for, if not for venting it out. Right?

Okay, I'm going to cut to the chase and tell you what we did for Daring Cooks. I'm sure you've seen on all other Daring Cooks' blogs, the fabulous Ricotta Gnocchi. Well, we did the same, only some of ours weren't firm enough thanks to inexperience, some arguments in the kitchen and sheer exhaustion. I promise we will do better next time! We made our own Ricotta and halved the recipe. This recipe is from the famous Zuni Cafe.

Photobucket


Ingredients

1 cup fresh Ricotta
1large cold egg, lightly beaten
1/2 tbsp Butter, melted
A couple of Sage leaves/1/2 tsp Dry Sage
1/4 tsp Nutmeg
1/8 cup Parmigiano Reggiano, grated
1/8 tsp Salt
All-Purpose Flour for rolling the Gnocchi

We made our own Ricotta and let it strain overnight and for half a day. In spite of this, there was still some moisture left. Sigh.

Photobucket

Anyway, we decided to pucker up and do our best on this recipe and make the Gnocchi. Here are the steps we followed.

1. Mash the ricotta well to form a smooth paste like mix. You may mash it with a spatula and make sure to rub it across the dish to make sure there are solid curd like formations.

2. Add the lightly beaten egg to the mashed ricotta.

3. Melt the tablespoon of butter. As it melts, add in the sage if you’re using it. If not, just melt the butter and add it to the ricotta mixture.

4. Add in any flavouring that you’re using (i.e., nutmeg, lemon zest, etc.). If you’re not using any particular flavouring, that’s fine.

5. Add the Parmigiano-Reggiano and the salt.

6. Beat all the ingredients together very well. You should end up with a soft and fluffy batter with no streaks (everything should be mixed in very well).

To form the Gnocchi:

7. In a large, shallow baking dish or on a sheet pan, make a bed of all-purpose flour that’s ½ an inch deep. Meanwhile, fill a small pot with water and bring to a boil. When it boils, salt the water generously and keep it at a simmer. You will use this water to test the first Gnocchi that you make to ensure that it holds together and that your Gnocchi batter isn’t too damp.

8. Using a tablespoon, scoop up about 2 to 3 teaspoons of batter and then holding the spoon at an angle, use your finger tip to gently push the ball of dough from the spoon into the bed of flour.

9. At this point you can either shake the dish or pan gently to ensure that the flour covers the Gnocchi or use your fingers to very gently dust the Gnocchi with flour. Gently pick up the Gnocchi and cradle it in your hand rolling it to form it in an oval as best as you can, at no point should you squeeze it. What you’re looking for is an oval lump of sorts that’s dusted in flour and plump.

Photobucket

10. Gently place your Gnocchi in the simmering water. It will sink and then bob to the top. From the time that it bobs to the surface, you want to cook the Gnocchi until it’s just firm. This could take 3 to 5 minutes.

Have a sheet pan ready to rest the formed Gnocchi on. Line the sheet pan with wax or parchment paper and dust it with flour.

For the sauce:

5-6 tbsp Red pepper, finely chopped
1 tsp Sage or any herbs you may want
1/2 tbsp butter
1/2 tsp salt
1/2 tsp pepper/paprika

We stuck to a simple sauce. We tossed some finely chopped red peppers and some sage in some butter and accentuated our already rich Gnocchi with some colour ;)

The recipe recommended that we make the Gnocchi, test one or two and then refrigerate the rest for an hour or so. We highly recommend this step. If it wasn't for this resting time, our Gnocchi would have surely crumbled in the water.

And this Gnocchi is WORTH it all. It was so light and so, so, so good that my mouth salivates even now as I write this post. Some of our Gnocchi was not firm while the rest withstood the hot water test pretty well ;) Frankly, we were too tired to take too many pics. So, I leave you with few pics, but this is a must try at least once. I've tried the potato Gnocchi (which I thought was tough) but found the Ricotta Gnocchi needs a lot more patience and yeah, make sure that Ricotta was drained properly. I'm sure if we'd let it strain for another day, our Gnocchis would have been firmer.

Photobucket

At the end of it all, we loved doing this challenge. We've always wanted to try Ricotta Gnocchi, just not had the courage so far. This challenge pushed us and we are looking forward to doing more with the Daring Cooks!

Sunday, May 10, 2009

Sour Cherry Cake

Spring is in the air, so says Meeta and so, we listened. A is ever-ready to bake. Always. Every night. And when I mentioned that Meeta had an event and we had to bake a cake. A sprang (no pun intended :D) upon the idea and raided the Farmer's Market for berries. While we went looking for berries, we came back with some cherries. We initially thought of baking Mahanandi's Chocolate Cherry cake- a winner of a recipe which has been tried and eaten umpteen number of times by me. A, very obviously, wanted to try out something else and also use our hardly used bundt/tube cake pan (I'm not even sure if that is what it is!)

Photobucket

The cake was moist, speckled with cherries, made for a great dessert after an Enchilada meal :D Here is the recipe. Its as easy as a cake can be!

Ingredients

1 c AP flour (set aside 2 tbsp separately to coat the cherries)
1/2 c chopped cherries
1/2 c + 2 tbsp sugar
2 eggs
1/4 c sour cream
1/4 c milk
5 tbsp butter
1/4 tsp b.soda
1/2 tsp b.powder

Photobucket

1. Preheat oven to 350 F

2. Melt the butter and allow it to cool. In a separate bowl, toss the cherries with 2 tbsp of flour.

3. In the meantime, beat the eggs, one at a time with an electric beater. After adding the third egg, add the sugar gradually and beat well at medium speed until creamy.

4. Add the melted butter slowly. Beat for another two minutes.

5. Whisk the sour cream and milk in a bowl. Sift the leavening agents and the flour alternately with sour cream/milk. If you still see lumps, take a whisk and beat the batter until they disappear.

6. Fold in the cherries gently. Do not beat.

7. Pour the batter into the fluted pan and bake for about 25 mins. or until a skewer comes out clean. Take it out of the oven immediately. Invert it on to a flat plate and let it cool completely.

8. Run a knife along the edges and try to pry it if it doesn't want to come out. This is exactly what happened with ours as the cherries sank to the bottom. But well, it still tasted good ;)

Photobucket

However, we had a couple of problems. One, the cake was REALLY soft and was tough to take out without breaking it! And two, though we dusted the cherries with flour per popular baking advice, they still sank to the bottom. There were a few in the middle of the cake too, but nothing on the top! We do realize that the more liquidy the batter is, the more the cherries sink. And thicker the batter, lesser they sink. But, still, we'd like to know if we should know something else about sinking berries or cherries!

Oh, like we mentioned, this goes to Meeta of What's for Lunch, Honey? for Monthly Mingle # 32. This month, we are celebrating the season's offerings! And this cake is a great cake for any and all sorts of berries. Do let us know if you try it! And hey, try it!

Saturday, March 21, 2009

Project Ramekin.

This is an idea we came up with recently. And no it doesn't need any participation from anyone. We happen to be the only participants in this project ;) We're just two people and we are suckers for desserts. When we come across recipes on various sources, they invariably ask for cups of flour, lot of eggs, cream, sugar, so on and so forth. Initially, in order to learn baking and to feel more confident about ourselves, we followed the recipes to the T. Sometimes we ended up with some great stuff, but in huge amounts for just two people! And I personally think that desserts are at their best when consumed fresh. The longer they stay in the refrigerator, the less delectable they become. For instance, the hazelnut flour cake we tried came out great, but it was a LOT for just the two of us. And we're not Ina Garten to host parties almost every single day ;) So we end up consuming most, if not all of the goodies! So we decided to start scaling down recipes. This serves several purposes.

1) Less stuff to eat (or discard, if it doesn't succeed ;))
2) Is it really possible to scale down certain recipes? (Consider meringues and so on)
3) While scaling down, can we add or subtract some of the 'rich' ingredients and still retain the flavor of the dish? If the answer is yes, then it rocks! If not, then we're eating less of it anyway. So its a win-win situation ;)
3) Portion control. This is a key if you're on a diet and still want to indulge in small amounts. Also, sometimes its really cool to serve individualized desserts when you're hosting a few people.


With this in mind, the geek in me came up with Project Ramekin. That is to scale down and experiment with all the good desserts until I can get them into a ramekin...or 2 at the most ;)

The first successful recipe that we're posting is that of a chocolate hazelnut torte. Its different from a muffin as it doesn't necessarily require flour so you get a nice, dense chocolate flavor. Or as I like to say: "more bang for your buck' ;)

Here's the original recipe I followed. As you can see, it needs a ton of stuff. 1 cup (equals 2 sticks!) of butter, so on and so forth. Lot of fats, to be honest ;) And note that it prepares four servings according to them.

I scaled down the recipe to use just one egg. So here's mine:

1 large egg
2tbsp butter
1/8 cup semi sweet chocolate chips
1/5 cup toasted, de-skinned hazelnuts (I used about 6 individual nuts)
1/4 cup brown sugar, packed (this is less than their prescribed amount)
1/2 tsp cocoa powder
1/2 tbsp unbleached all-purpose flour


When you're baking at 10 PM in the night, you really don't have patience to take out that hand beater and use it and clean it. So, in a small blender (called mixi in India :D), pulse the butter and sugar. Scrape the sides and add the nuts. Pulse a few times. Add the chocolate chips and pulse a few more times. Finally, add the egg, cocoa powder and the flour and pulse it a couple of times. The idea is not to overbeat the eggs.


Pour it in the ramekin and bake it at 350 F until a skewer comes clean, about 23 mins. in my case.

The amount of batter was actually less than 1 ramekin but I didn't fill up to the brim, the whole ramekin because I feared that the rising will cause things to overflow. So I filled about 2/3rd of the ramekin and was left with a tbsp or two of batter which I ended up discarding. So their 4 servings would actually amount to five of our servings...something that worked to our advantage ;)

I've never baked a torte before so I chose to add a little bit of flour to be on the safer side. I guess I might try to make a flourless one in future :) But this came out really well! At first, it looked a touch crusty on the outside. But when we dug into it, we could clearly see (and taste) the dense, rich chocolatey goodness inside :D We devoured this in a couple of minutes :)


What do you think of this project? We plan to post frequently on experiments in our kitchen. These are not dishes no one's tried before, or very unique or tough dishes. They are 'our' experiments in 'our' kitchen. So, it could be a success or like a lot of times, failure! Let us know!

Thursday, March 5, 2009

The Pineapple Express...err...

And a low fat one at that! At 9 PM on a Thursday night, we certainly couldn't eat a rich cake. So, after a regular meal of Dal-Chawal, we craved for some dessert. Like always. I can hear you snickering btw. Go on, snicker. Wait until you see how lowly this cake is...err.. in terms of fat and size only. It tasted pretty good! See?


Thanks to our dessert obsession, we bake very small amounts every night. It doesn't last the night itself ;) This time around, we baked a very simple cake using apple sauce instead of butter. Later, it struck us that we could have used just egg whites to make it more low fat than what it already is. So, here it is.

Ta-daaaaaaaaa


Ingredients


2 slices of pineapple
1/2 cup flour
1 egg
1/3 cup sugar
1 tsp vanilla extract
1/2 tsp baking powder
1/4 tsp baking soda
1 tbsp fat-free milk (optional)
8 tsp applesauce
2 tbsp pineapple juice
A pinch of salt


1. Preheat the oven at 35oF

2. Beat the egg at low speed for a minute. Add sugar little by little. Switch to high speed while doing this.

3. After the volume has atleast doubled, add the applesauce, vanilla extract, milk, pineapple juice and salt. Continue to beat for another minute.

4. Sift in the flour, baking soda and baking powder into the wet mixture.

5. Stop beating and fold in gently. Make sure there are no lumps.

6. If you're using canned pineapple, you can grill it for a min to make sure the moisture is gone and those lovely grill marks come on the pineapple. If it is fresh make sure to grill it. If you don't have a grill, but have an electric stove with the coil. Place on it at low heat for about a minute or two until the grill marks appear.

7. To assemble this cake, place the pineapple grilled side down in a greased baking pan or a loaf like us. Then, pour the batter evenly over the pineapples. Bake for 25 minutes or until the toothpick trick works!

8. Once you take it out of the oven, run a knife around the edges and let it cool for 10 minutes. Then flip it upside down. The pineapple on the other side looks gorgeous by the way :) Our really badly taken pictures don't do it justice! *cue to say your pics are good* :D

You could bake these in ramekins also. However, our ramekins were too small for our pineapple slices! So, we baked it in a loaf with dimensions 8.5" x 4.5" and 2 inches deep. Simple and easy to make, you can add some brown sugar instead of regular sugar to caramelize it further :)
P.S.- The measurements of Applesauce are given in a funny, stingy tsp way only because we were experimenting and did not ladle tablespoons of applesauce, but used teaspoons!

Friday, January 9, 2009

Simple and Citrusy!

Happy New Year to all of you! For everyone who left messages for us, thanks so much for remembering us! We've been away for a long long time now, and its been a difficult time. Job search during recession sucks is what I've learned in the past 4 months and decided to plunge into academics all over again after a good 5 years! And it did not help that I was on diet after diet to try to do something about my 2008 resolutions :P Of course, I have almost the same resolutions for 2009 also. Hopefully, this will be a lighter year on everything, literally ;)

A loves to have a dessert after every meal if possible. And especially after dinner. Thanks to our baking obsession, we bake something almost every single day. Lately, we stopped doing so thanks to a change in the weighing scales for me. It did not seem to affect him, strangely! However, we still have our days when we go crazy and bake at 10 PM in the night. This is one such lemony cake that we came up with two hours ago. It is now 12.56 AM! Thankfully, we baked an XS cake - super small in size but huge in flavour and the zing :) I love citrusy flavours and can never tire of them. A is not too fond of them, but then :P who is the life of our family? Me! So, we baked this cake for me and here you go, here is the recipe for a simple lemon cake!


Ingredients:

1 egg
1/4 cup +2 tbsp All-purpose flour or Cake flour
1/4 cup sour cream
1/2 tsp baking powder
1/4 tsp baking soda
1/4 cup + 2 tbsp sugar
Zest of 1 lemon
1 tbsp butter
1/2 tsp lemon essence
Pinch of salt

1. Beat the egg. Cream melted butter and sugar. Add this mixture to the beaten egg.

2. Add the baking powder and the baking soda

3. Add sour cream and beat one more time

4. Fold in lemon zest and the lemon essence

5. Fold in the flour little by little. Sift the flour if it is AP flour. Cake flour can be added as it is. Do NOT overbeat/mix.

We poured it into a 4 inch (1 inch deep) ramekin making the cake small, just enough for the two of us- a late night lemon-sweet craving :) This cake is fairly light too because it needs just 1tbsp butter and we used fat-free sour cream! So, there! Keeping up with the resolutions and all that ;)

It is quite citrusy and comes out beautifully moist and a fresh yellow in colour. We had ours with some warm blackberry sauce. We had some blackberry-raspberry preserve that we added some hot water to, and thinned it to bring it to a sauce-like consistency. While the cake was mildly sweet, the sweetness of the blackberry sauce added a new dimension to the cake. I loved the mild sweetness and preferred the lemony zing in the cake. You could add more sugar if you wish!


This piece of cake specifically goes out to Nags :) for encouraging to come back to blog all over again. Thanks man!

Thursday, July 17, 2008

Challah: the Eat-away Braid...and a tag!

First of all, I am pretty new to the blog world and therefore not very familiar with the netiquittes :) So I'd like to address the unintentionally ignored tag. The responses are given at the end of this post. Also, we have tagged Nags and Shreya to keep the ball rolling. We know they like tags!

Coming back to the post, I think we've discontinued from the "Baking Binge" for a couple of posts, although we've been baking like crazy :) Take a look at this cartoon. I think we're at level 3 now :D.


This time we followed Rosa's Challah bread recipe. Once again, the ingredients were cut down by half (except the yeast....I shudder at the thought of a dough that doesnt rise!). And for the topping, we used sesame seeds. Her recipe worked like a charm!


The smell was heavenly and so was the taste! The bread had a nice, golden outer crust but was very soft on the inside. Rosa, you are a magician and nice enough to share your tricks of trade through your blog :) So I guess this is yet another -"tried and tested", approved, baked, photographed and devoured immediately- post after following the Focaccia! See it for yourself :)


Once again, for the detailed recipe please check out Rosa's blog. She also gives some excellent tidbits of wisdom every now and then :)

Disclaimer: The cartoon is meant solely to depict the stages of evolution with a lighter side to it. It is in no way, shape or form a comparison between Daring Bakers and Homer Simpson ...although the concoctions by daring bakers are certain to turn ordinary mortals into one in terms of appetite :D.
___________________________________________________________________

We've been tagged!

1) LAST MOVIE U SAW IN A THEATRE?
A- Baby Mama - at N's behest. I wanted to watch Iron Man!
N- Can I say that I have NOT yet watched 'The Sex and the City?' BTW, Baby Mama sucked, yes.

2) WHAT BOOK ARE U READING?
A- Principles of Nonlinear Optics by Butcher and Cotter. I think my geekiness has been exposed!
N- To Kill a Mockingbird

3) FAVOURITE BOARD GAME?
A- Scrabble!
N- Who will he play with? ;) Scrabble for me too!

4) FAVOURITE MAGAZINE?
A-Science Magazine, Nature, Journal of the American Chemical Society, Journal of Physical Chemistry (B and C), Materials Today and Advanced Materials. I think I am a certified nerd now!
N- Err..my list won't sound as hi-fi as someone else's. I'd say mainstream political magazines, oh, gossip ones will do too :P

5) FAVOURITE SMELLS?
A-Food, Jasmine.
N- Fresh coffee, Monsoon, smell of earth, bread :), chocolate cake, chai, and lots more!

6) FAVOURITE SOUNDS?
A- Flute, mandolin, violin, acoustic guitar (peaceful vibes).
N- My voice ;) How vain can I get? But I do not listen, I just talk :P

7) WORST FEELING IN THE WORLD?
A- Being dismissed/ignored.
N- Hearing a 'NO' to my offer to watch Sex and the City :(

8) WHAT IS THE FIRST THING YOU THINK OF WHEN U WAKE?
A- Give me some coffee and bring on the day :)
N- Can't it be night again? Or, can I have 5 more minutes (read: forever)

9) FAVOURITE FAST FOOD PLACE?
A- Papa John's pizza (I order more frequently though)
N- Any road-side joint in India (this works for A too. He is just being pseudo ;)) and ya, Papa John's with an extra order of cheese is the only choice in the US no?

10) FUTURE CHILD'S NAME?
A- Haven't thought one yet.
N- Now, you know who thinks of sensible things and the future. Sigh. I want twins. Period. Nakul and Nakshatra... and...

11) FINISH THIS STATEMENT—’IF I HAD A LOT OF MONEY I’D’
A- Put it in a bank. Yup, I'm boring!
N- Hmm...ya, put it in a bank, or maybe, go on a world tour!

12) DO U DRIVE FAST?
A-Yes I do :)
N- Do I have a choice in this country? ;)

13) DO U SLEEP WITH A STUFFED ANIMAL?
A-No.
N- No, not yet ;)

14) STORMS–COOL OR SCARY?
A-If I'm home, and if the storm doesn't cause electricity to fail, pretty cool! If I'm driving or outside, scary!
N- Cool all the time! Much fun to be had ;)

15) WHAT WAS YOUR FIRST CAR?
A- Camry
N- None of my own, but my dad's Premier Padmini for both good and bad memories :)

16) FAVOURITE DRINK?
A- Ganne ka ras (Sugarcane juice)
N- Chai? Brings loads of memories

17) FINISH THIS STATEMENT-IF I HAD THE TIME I WOULD…
A- Travel across the world.
N- Me too!

18) DO YOU EAT THE STEMS ON BROCCOLI?
A-If cooked well enough, yes.
N- No, coz they are healthy. For that matter, I hate broccoli

19) IF YOU COULD DYE YOUR HAIR ANY OTHER COLOUR, WHAT WOULD BE YOUR CHOICE?
A-I like it the way it is. Absolutely no changes in its hue :)
N- Red!

20) NAME ALL THE DIFFERENT CITIES/TOWNS U HAVE LIVED IN?
A- Chennai, Jaipur, Delhi, Haldia, Panipat, Ambala, Karnal, Rajkot, Mumbai, Gandhidham, Surat, Gainesville Florida, Ann Arbor Michigan, Atlanta, Georgia.
N- Err... do you want to know this fact about me? Bangalore and Hyderabad before Atlanta!

21) FAVOURITE SPORTS TO WATCH?
A-Cricket, Baseball, Football (NFL), Basketball.
N- None after marriage, thanks to an overdose. Sigh.

22) ONE NICE THING ABOUT THE PERSON WHO SENT THIS TO YOU?
A-Indranee.....very kind of you
N- Indranee - she's nice coz she gave me a chance to talk ;)

23) WHATS UNDER YOUR BED?
A-We dont want to go there...its not vacuumed very often :D
N- I send A there to clean up. So, I dunno!

24) WOULD U LIKE TO BE BORN AS YOURSELF AGAIN??
A-Given the same parents, absolutely!
N- No. I'd like to be born with a good figure, and a creamy complexion :D

25) MORNING PERSON OR NIGHT OWL?
A- Morning person.
N- Night owl

26) OVER EASY OR SUNNY SIDE UP?
A-Somewhere in between
N- Sunny side up

27) FAVOURITE PLACE TO RELAX?
A- Home sweet home!
N- Hmm...near a water body :)

28) FAVOURITE PIE?
A- Pumpkin and Pecan
N- Is there a chocolate pie? :D

29) FAVOURITE ICECREAM FLAVOUR?
A-Oh come on, I cant name one! Butter Pecan and Praline cream are joint first.
N- I can name one. Chocolate is the word.

30) OF ALL THE PEOPLE U HAVE TAGGED, WHO IS THE MOST LIKELY TO RESPOND FIRST?
Err..Nags :D coz she LOVES tags, so says N ;)